Questionnaire
Questionnaire is the first tab of the project detail. This is the most important part where we fill in all the details about our project.
Current Phase
If the knowledge model we use for the project has phases defined, we can see a phase selection in the questionnaire detail. Different questions become desirable based on the selected phase. For example, some should be answered before submitting the proposal, while others can be filled later. The phase progress is also visible.
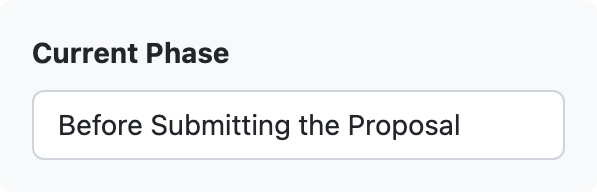
Phase selection widget.
By clicking the phase selection we open the modal window where we can choose the current phase.
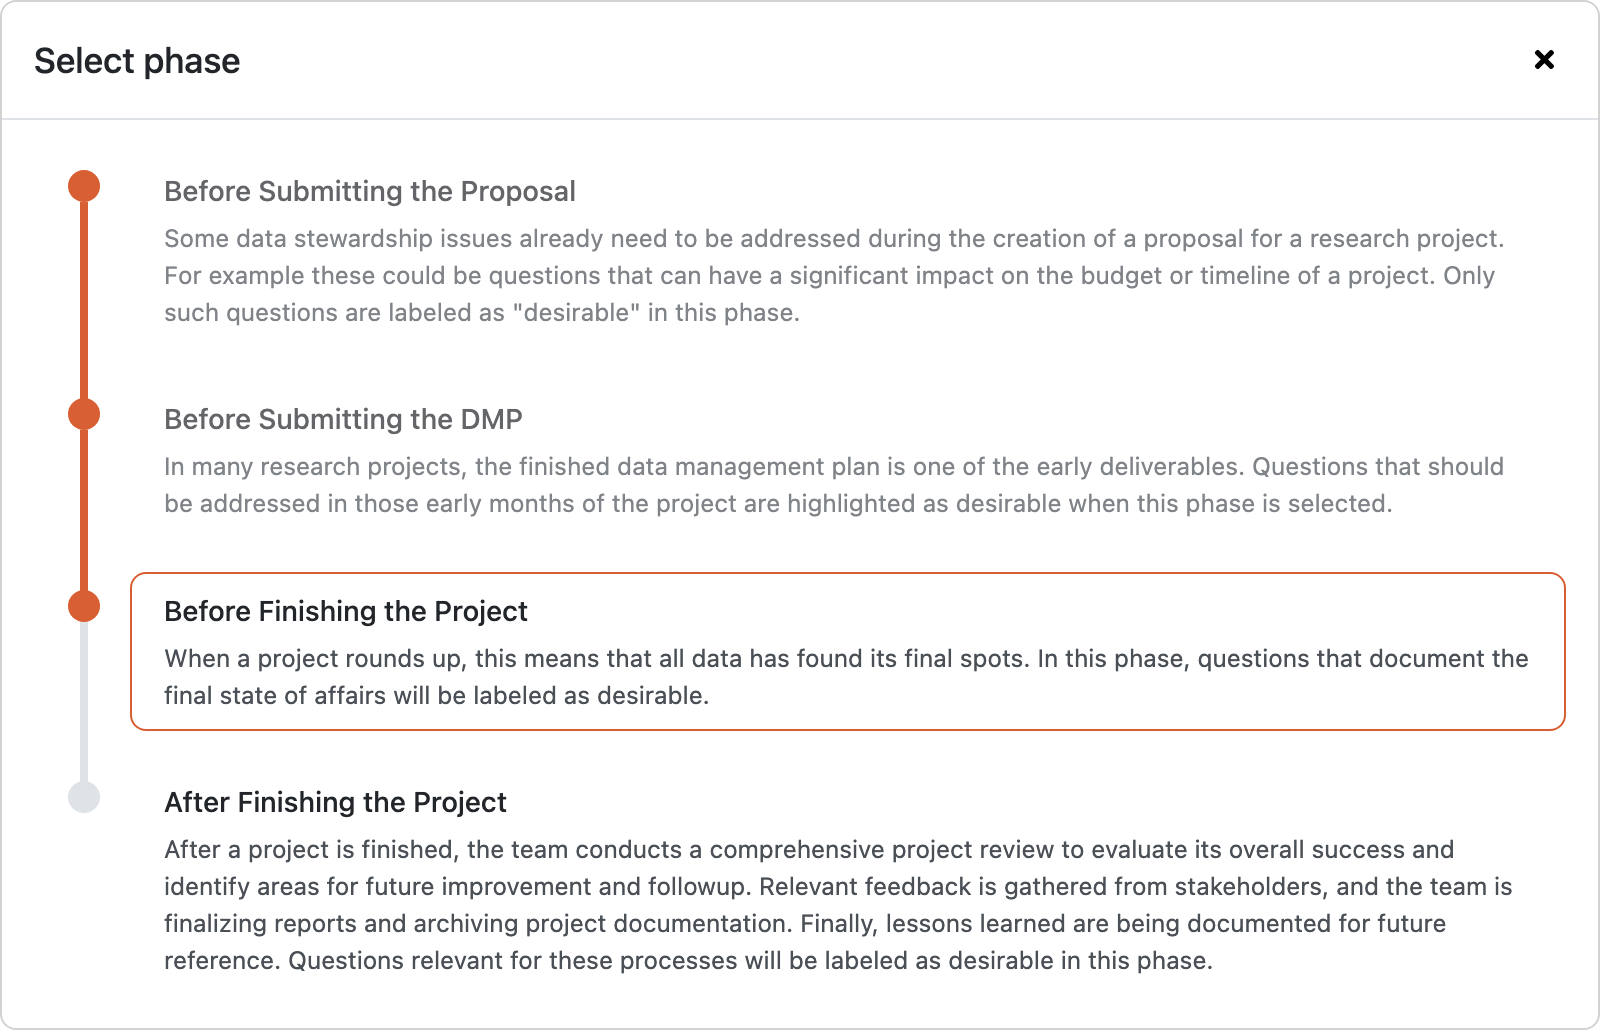
Phase selection modal window.
We can see the desirability of questions based on the phase we are currently in. We can also see the number of questions that still need to be answered in this phase for each chapter in the chapter list.
There are three desirability states the question can be in:
red, with a pen icon - this question must be answered in the current phase
light grey, with an hourglass icon - this question will have to be answered in some later phase
green, with a checkmark icon - this question has already been answered
Note
If there is no phase defined on the knowledge model, the current phase selection is not visible in the questionnaire detail.
Chapters
Below the current phase selection, we have a list of chapters. We can see the number of questions that are yet to be answered in current phase (or overall if there are no phases defined in the knowledge model). We can use this list to navigate freely between chapters.
For the opened chapter, we can see a navigation tree for the chapter structure, showing the questions, follow-up questions, items, etc. We can use this tree to quickly navigate to a specific question in the chapter.
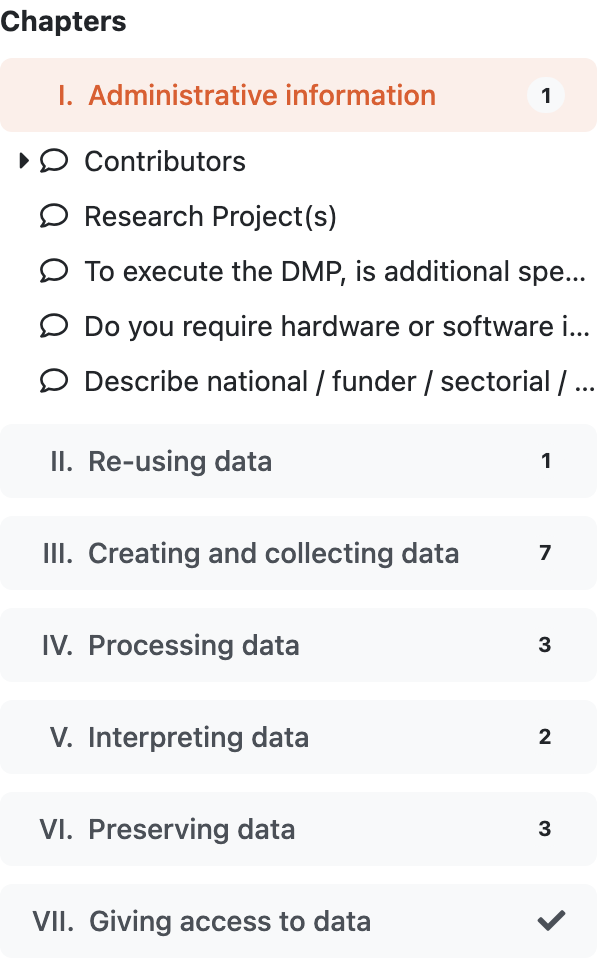
Chapter list showing the also the questions for the opened chapter.
Questionnaire Area
The questionnaire area fills the most space in the questionnaire screen. It displays the questions and answers from the opened chapter.
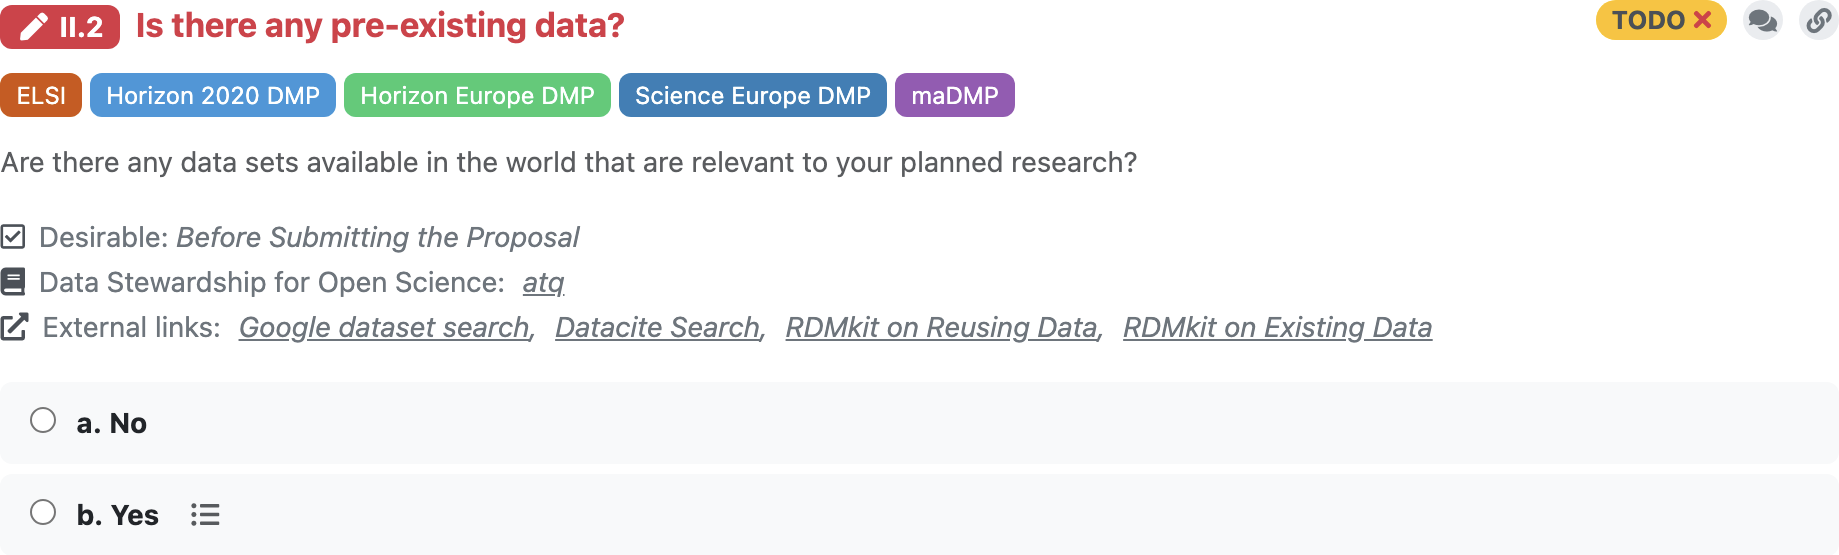
Each question has an identifier which indicates the chapter it belongs to, as well as its order and nesting within the chapter. For example, I.1.a.5, where the Roman numeral represents the number of the chapter, and the remaining numbers indicate the order and nesting of the question. Then there is also the question name.
Some additional information can also be part of the question:
Question tags - can indicate some additional grouping of questions, for example what DMP templates is this question used for
Description - additional information explaining the question
Desirability - what phase this question become desirable in
List of references - links to additional external resources related to the question
List of experts - whom to contact when help is needed with answering the question
Based on our role in the project and specific instance settings there are some additional actions besides answering the question:
We can get more information on how various collaboration tools work and can be used in Sharing.
The most important part is, however, answering the question. The way of how to answer the question differs based on the question type.
The following video tutorial explains questions and different question types in more detail.
Options Question
Options question has a list of pre-set answers and we can choose one from those. There can be some follow-up questions (indicated by the icon by the answer). These questions are displayed only if we select that answer.
If there are some metrics set for the answers, we can see labels with the metrics by the answer as well. The color of the label indicates how good or bad the answer is (red means bad, green good, yellow something in between).
Options question with a closed set of answers.
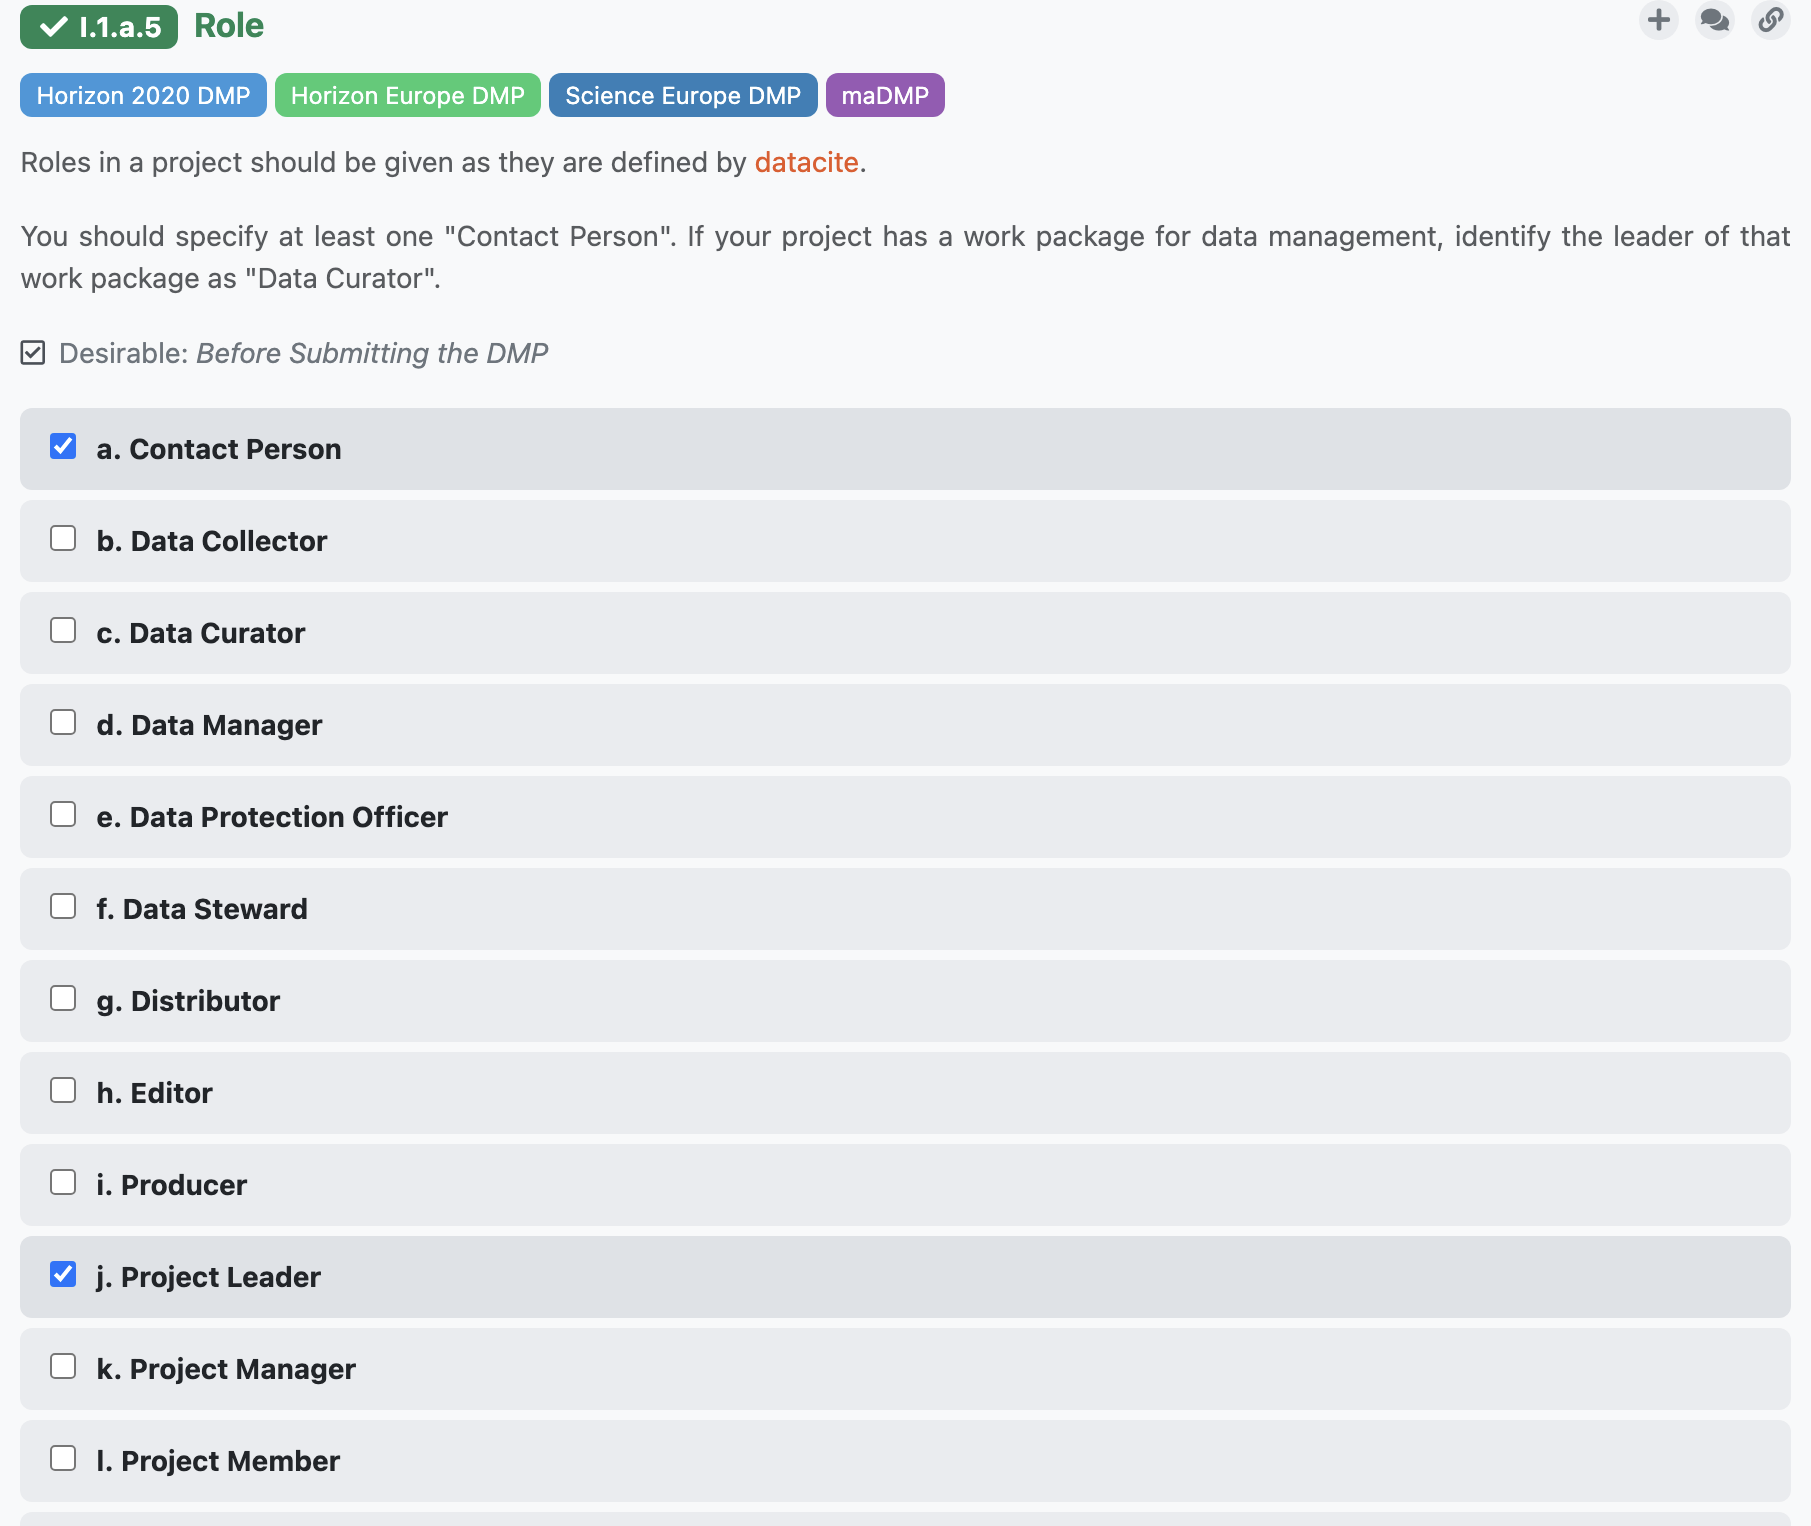
List of Items Question
List of Items question doesn’t have a simple answer but a list of items. Each of the items has the same set of subquestions. For example, a list of items question asking about the project contributors where each item represent one contributor with questions about their name, role, etc.
We can simply click on Add button under the question to add a new item. Then, we can answer the questions for the item. If the item has a lot of questions, we can use the arrow icon in the item’s top left corner to fold/unfold the item. We can also use Expand all and Collapse all buttons in the question menu to fold/unfold all items at once. The Expand all and Collapse all buttons are visible before the listed items if there are at least two items and also below the listed items, if there are more than two items.
There is a trash bin icon in the item’s top right corner that we can use to delete the item. If there are more than one item, there are also arrow icons that we can use to change the order of the items.
The first question in the list of items question is used as a label for the item. It can be any type of question.

List of items question with a multiple items.
Value Question
Value question contains an input field for our answer. This can be a simple text field (such as asking for a project contributor’s name), or some additional widget, for example a date picker.
All of value question types (except for color) can have validations set on them. We can still type in an invalid answer, but it will display a warning and also show it in the list of warnings.

Value question with a simple text input.
Integration Question
Integration question is connected to an external resource where it searches for the answers. The input field works as a search field, so when we start typing something, it will search the external resource and offers us a list of possible answers.
When we pick an answer from the list, we not only have the answer but also a link to the selected item in the external service. If the answer we searched for is not there, we can simply keep what we have written in the input field. We just won’t have the link with this answer.
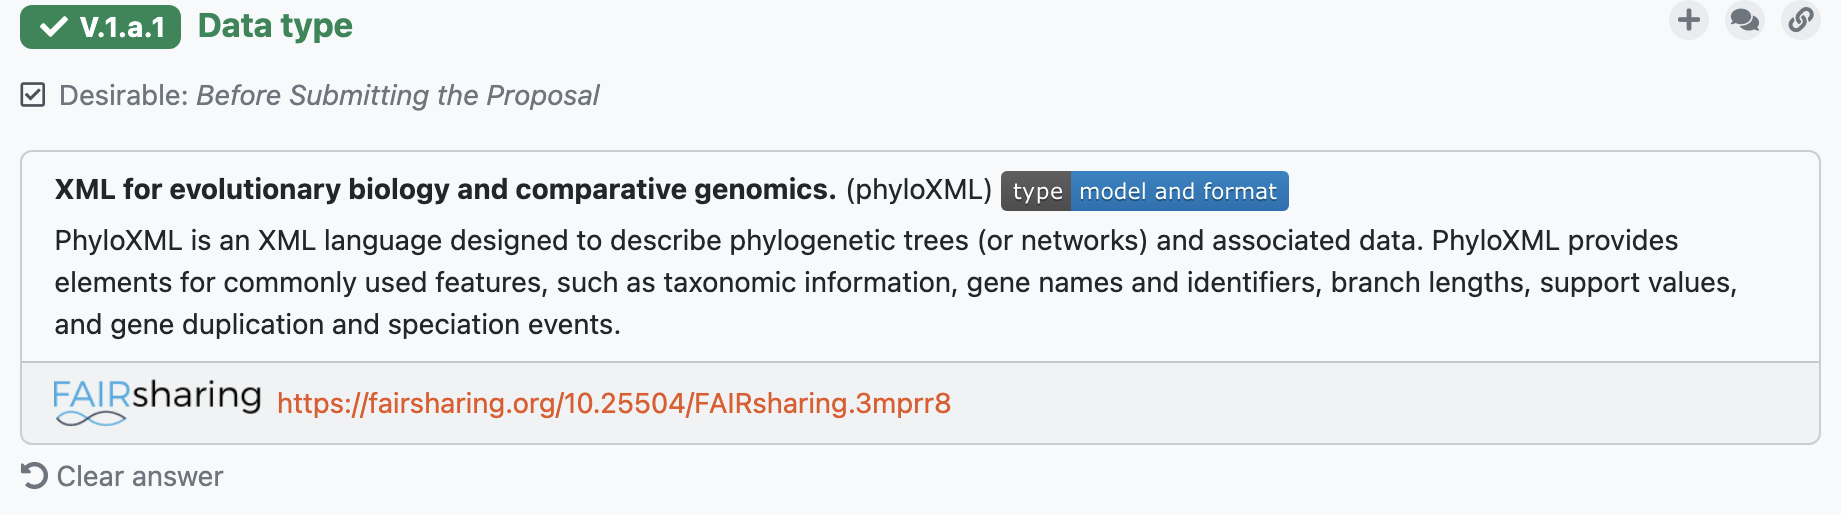
Integration question with a response from FAIRsharing containing also a link.
Multi-Choice Question
Multi-choice question is similar to the options question, however we can choose more there one answer and there are no follow-up questions.
Multi-choice question with many choices.
Item Select Question
The item selection question is used together with the list of items question. When creating an item selection question, you must choose one of the existing list of items questions. The answers provided to that list of items question are then offered as possible answers in the item selection question. There is also a link to the item in the list of items question, so we can easily navigate to the item and edit it if needed. If there is no answer available in the list of items question, there is a link to create a new item.

Item select question with a list of items as possible answers.
File Question
File question is used when we need to upload a file as an answer. We can simply click on the Upload File button and select the file from our computer. We can also drag and drop the file into the input field.

File select question with a uploaded file.
View settings
In the questionnaire tab, there is a menu bar with various options. The first one is View, where we can show or hide some question details:
Answered by - show/hide who and when answered questions
Phases - show/hide what phase the questions are desirable in
Question tags - show/hide the question tags
Non-desirable questions - show/hide questions that are not desired to be filled in current phase
Metric values - show/hide value of metrics for accessibility purpose
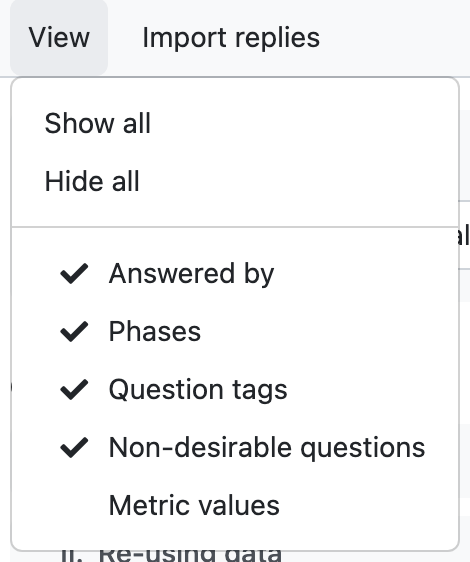
Different view options accessible form the questionnaire toolbar.
Note
If at least one of the options is turned off, a red dot will be displayed next to the :guilabel:View button.
Import answers
Questionnaire answers can be imported for various sources using importer plugins. The importer plugins needs to be enabled by the administrator first, then they are available in the questionnaire menu bar. The Import answers button is only visible if there is at least one importer plugin available for the project.
Warnings
All of value question types (except for color) can have validations set on them. If it is an invalid value, we will see Warnings tab in the questionnaire menu bar with a badge showing the number of warnings. If we click on it, we can see a list of all questions that has a warning and we can click on it to navigate quickly to that question.
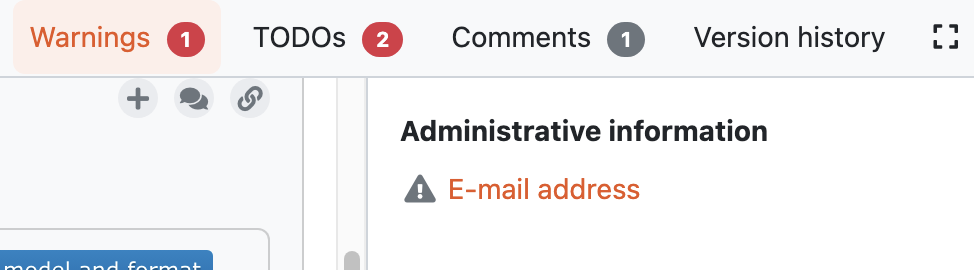
Warnings referring to questions with invalid values.
TODOs
When we are filling in the questionnaire, we can stumble upon a question that we don’t know how to answer yet, but we don’t want to forget to come back to that question. We can click on + Add TODO to add a TODO to the question.
We can then open the TODOs tab from the questionnaire menu to see the list of all questions with assigned TODO in the questionnaire. By clicking on a question there, we can quickly jump back to that question and fill it.
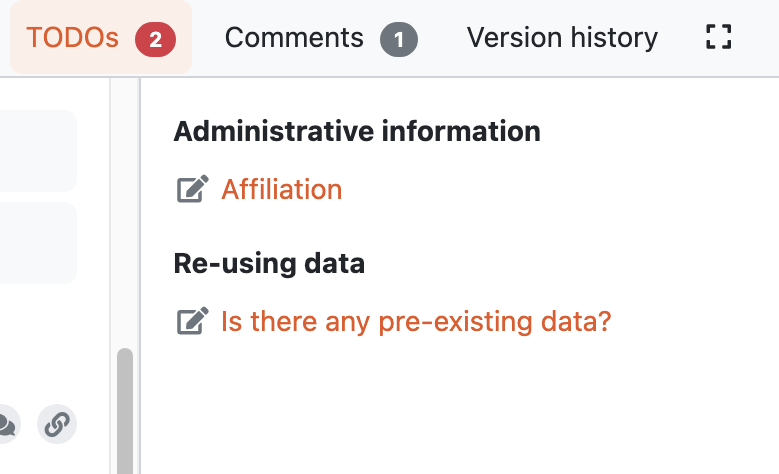
List of TODOs.
Version History
When we open the Version history tab from the questionnaire menu bar we can see the list of all the changes that happened in that questionnaire. We can see who and when made what changes grouped by months and days.
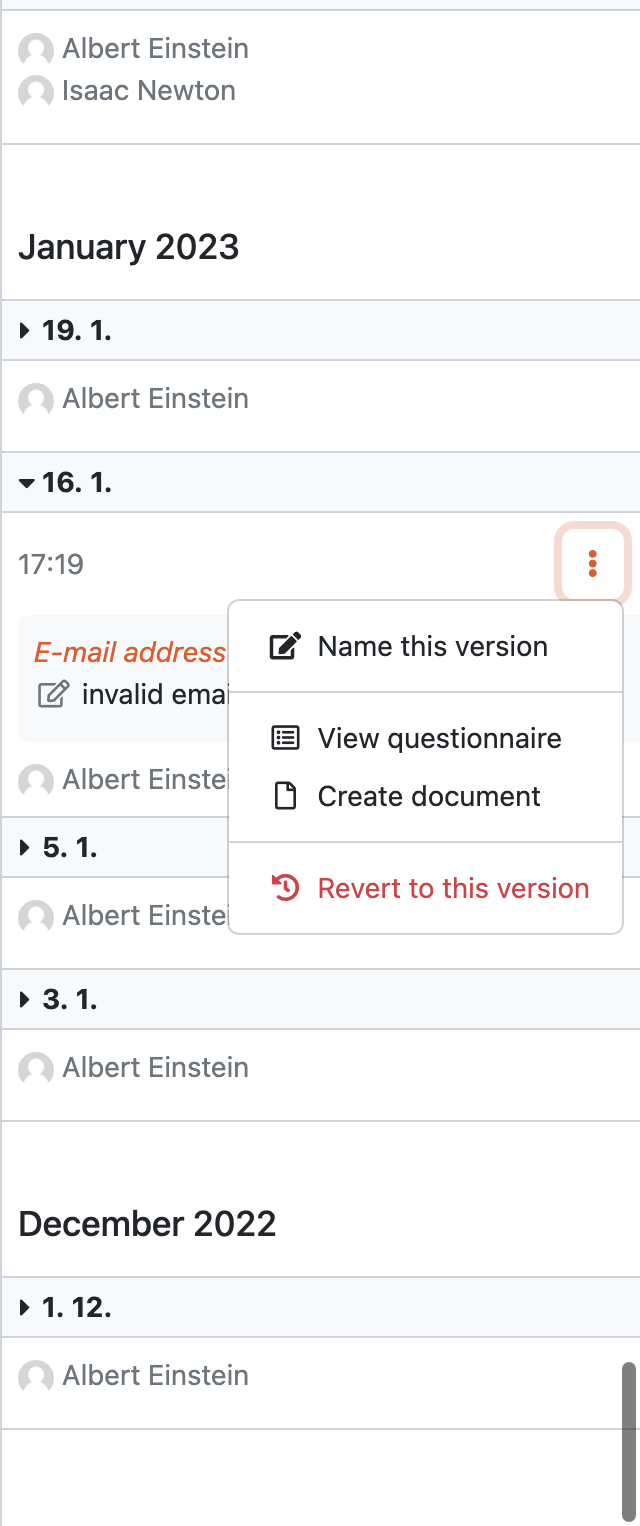
Version history shows all events changing the project.
Name a Version
At any point (also retroactively) we can name a version. Click on the triple dots on any event we want to name and choose Name this version. Then we just fill in name and description of that version. If the event already has a named version, we can choose Rename this version instead.
When we have some named versions, we can choose Named versions only. Then, we don’t see every single change but only the important versions we gave a name to.
View Questionnaire in a Version
Thanks to the version history, we can see how the questionnaire was filled at any point in the past. We simply find the event in the version history and choose View questionnaire from the event menu.
Create Document from an Older Version
Sometimes, we might want to create a document from an older version. For example, we created only a PDF document, but later we find out that we also needed a Word document. To do that, we simply find that version in the version history and select Create document. Then, we just fill in the details in the form and create the document.
Revert to an Older Version
We can also revert a questionnaire to an older version. We can simply find the desired version in the version history and choose Revert to this version from the event menu.
Warning
Reverting to an older version cannot be undone. It is therefore recommended to create a copy of the project before reverting.
Search
Search is accessible from the questionnaire menu bar by clicking on the 🔍 button. A search side panel opens where we can type in our search query. The search works in real-time, so while we are typing, the results are displayed below. We can fulltext search in questions and answers. In questions not only the question name but also description and references. The search is case insensitive.
We can click on any of the search results to quickly navigate to that question in the questionnaire.
Comments
We sometimes want to leave comments to discuss things with our team or just reminders for ourselves. We can write comments to each question in the questionnaire. The comments can be browsed using the navigation buttons.
Example of a comment.
Add Comment
To add a comment, we need to click on the comments icon by the question which opens a side panel with all the comments related to that question. Then, we can write the comment into the text box and submit.
View Comments
When there are any comments for a question, the comments icon is changed. It has a yellow color and shows the number of unresolved comments for that question.
In the questionnaire menu bar, there is also a Comments tab, showing a badge with the number of comments everywhere in the questionnaire. If we open the tab, we can see a list of questions for each chapter where there are some comments. Clicking on the question there will bring us to that question and open the comments side panel.
Assign Comments
We can assign comments to a specific user. This is useful when we want to ask someone to reply or when we want to assign a task to someone. We can assign a comment by clicking on the Assign comment thread button in the comment. We can also see who the comment is assigned to in the comment list.
When a comments is assigned to a user, they are notified by an email. Comments assigned to us are also visible in the profile.
Comment Threads
Comments are organized into comment threads for better clarity. We can either start a new thread or reply in an existing thread if our comment is on the same topic.
When the thread is resolved, we can click on the ✔ icon in order to resolve it. Resolved threads can be later viewed by selecting View resolved comments. They can also be reopened if needed.
Resolved Comments
When we resolve a comment, it is not deleted but only hidden. We can see all resolved comments by selecting View resolved comments from the comments tab. We can also reopen the resolved comment if needed.
Note
The View resolved comments switch is only present when there is at least one resolved comment in the questionnaire.
Editor Notes
Besides comments there are also editor notes which work the same way as comments but they are visible only to project editors and owners. We can use editor notes to internal communication with our team while working on the DMP and then comments to gather the feedback from supervisor or reviewer.